f

Saturday, June 30, 2012

Sleeves On Saturdays

The Cape Sleeve
This sleeve could actually be a cross over post with Fabulous Free Pattern Friday as it is really nothing more than half of a circle. And to be honest, it's easier to draft than a circle.
The sleeve just floats over the arm. Great for summer tops. Okay, I have to tell a short story here, Gail, who follows my blog left a message earlier today that had me rolling on the floor. Living in the United States, we forget that there is another side of the world where they are experiencing winter. It has been so hot here in Chicago. I can't remember a time when I have run my air conditioner as much as I have this summer. I ended yesterday's post with, "I hope you're staying cool." Gail replied, "Cool? That snapping you heard was the sound of my poor frozen toes breaking off." Gail lives in Sydney, Australia where it is now winter. So, to you Gail and any others who may stop by from the other side of the world, file this sleeve away until your warm weather arrives when you'll be able to smile knowing that we here in the midwest are probably freezing to death. When we have a really warm summer, it is usually followed by a really cold winter. And when I say really cold, I mean really cold!
Okay, so back to the sleeve. As I said, the sleeve floats over the arm, just like a little cape.
It's extremely easy to draft. Measure the armhole of your pattern as you see below. Make a note of the front armhole measurement and the back armhole measurement.
Using those two measurements, draw a straight line. The notch that is in the center is your shoulder mark. Decide the depth of your sleeve by measureing over your arm the amount that you would like for the sleeve to fall over your arm. Measure out from the center the amount that you would like the sleeve to fall over your arm and draw a curved line back to the ends of your straight line.
If you would like for your sleeve to have more fullness, divide the sleeve as you see below. Besure to number the pieces. 
I've included this picture as an example of what can happen. I cut through my line and one piece fell off. Now, what if other pieces fell off? I might have a difficult time putting the pieces back together. Believe me, I learned from experience! Number all of your pieces.
 Spread your pieces equally.
 In the picture below you can see that the spread lines don't line up.
 Basically, you want a nice smooth line so you will divide the difference in order to get a nice smooth line.
The final pattern. This will give you a very nice floaty little sleeve and it is so very easy to draft.
A lovely treatment for this sleeve is to do three that are stacked one on top of the other. The bottom sleeve would be widest. The second would be a little smaller and the last would be once again a little smaller. 
This is especially pretty in light weight fabrics like chiffons.
I hope you'll give this sleeve a try. It's so easy to do and it adds a lovely feminine air to any dress or blouse.
Hope you're having a lovely weekend whether it's warn or cold!!! 
Rhonda


Share this PostPin ThisShare on TumblrShare on Google PlusEmail This

Unexpected Gifts and Blessings

Do you ever go through periods where you question everything? Am I going in the right direction? Am I spending my time as I should? You see someone who has received a lucky break and ask, why not me? Which is usually followed by another question, what am I doing wrong? And then there's the larger question, am I making a difference?
A few weeks ago I was asked to do something that for me, was extremely exciting. I felt that I was being recognized and supported. I had not sought out what I thought to be an opportunity, it came to me. And then, it came to a thundering end leaving me asking many of the above questions as well as licking very deep wounds. My husband encouraged me to just shake the dust from my feet and keep on going.
As you know, every Wednesday I choose two followers who have blogs and I do a little showcase on my blog. It gives me a chance to say thank you for following my blog and I hope that it will help them to gain a little recognition for their work as well as open up everyones world to some of the wonderful things that are being created. Some weeks ago I told you about 
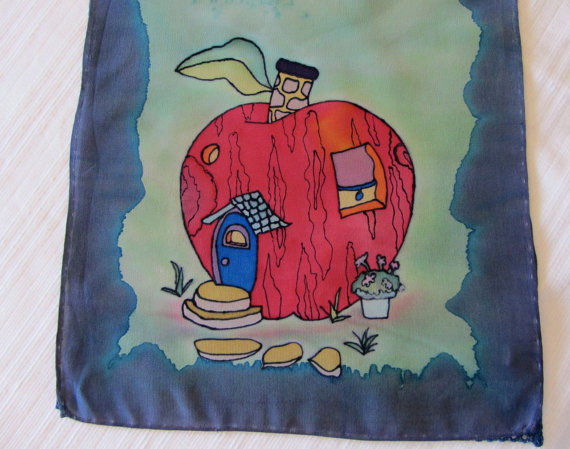
Jonadele Fashions. Joan lives in southern California and loves to dye. A little over a week ago, Joan posted this delightful scarf that she made.
I loved it. In fact, I loved it so much that I wanted to have it. The whimsical little houses looked so happy and they made me smile. I went back and forth about asking Joan if she would be interested in selling her scarf. Finally, I decided to just ask, the worst she could say is no.
The next morning I awoke to a very unexpected email, the scarf would be mine and it was to be a gift! As I read through Joan's email, I found myself speechless. How incredible. She said, "It is a thank you for doing so much for the home sewing world on your blog." Wow, I was surprised as I didn't feel that I've done anything. Joan went on to tell me that after I did the post on her blog, her traffic increased quite a bit, so this was her gift back to me. I felt that I had won the lottery and I didn't even buy a ticket.
The scarf arrived yesterday and it is so lovely.
 And it is even signed by the artist herself!! How lucky am I?
Joan went on to tell me that she had wanted to sell her things, but had just not taken the steps to do so. I wrote her back and told her to get her Etsy shop up and running as when I received her scarf I would like to show not only the scarf, but other items as well.
I am very pleased to announce the opening of http://www.jonadelefashions.etsy.com/!! Below are some of the items that are now in her store.

 This little scarf is beyond cute. I love it!
 My Celtic spirit loves a thistle.


 I watched the transformation of this piece on her blog.
When she first dyed the piece, it looked like this. I thought it was nice, but Joan decided to dye over it and the end result is above. She was right, the final product is beautiful.
 Joan also does scarves out of antique kimonos. Really lovely.
Stop by and take a look at her new store and then go by her blog and maybe say a quick hello. I know that she'll be happy to have you.
Just when I needed it, a blessing and a message came to me in the form of a scarf. My little Wednesday Showcase will not end any wars or bring about world peace, but, in an extremely small way, I am making a difference. I think we all question our lives on a regular basis. In fact, if we don't, we probably should. If there's a dream in your heart, follow it. It doesn't mean that there won't be disappointments along the way. After all, we would never appreciate the mountain top had we not experienced the valley. Thank you Joan!


Share this PostPin ThisShare on TumblrShare on Google PlusEmail This

Friday, June 29, 2012

Fabuous Free Pattern Friday

Happy Friday Everyone!!
You may remember that I posted this top last August, The Three In One Top. You can see that post here. The top can be worn as you see it below. It can be worn so that it drapes down the back, or you can wear it off your shoulders.
For today's post, I have done the pattern once again, but made it into a dress and added two more triangles at the hem as you see in the picture below. I have also made openings in the sides of the upper triangles so that I could thread a belt through.
This is a dress that is perfect after a day at the beach or the pool. It's easy to throw on and will take you anywhere you would like to go without looking like you've just come from the beach. Also great for a relaxing summer evening.
To do the dress, follow the instructions from the top (which you can find here) but lengthen it to your desired length. For the lowere triangles, I cut mine exactly the same dimensions as I cut the upper triangles. There is one change you will need to make to the lower triangles, the bottom will need to be rounded as you see in the picture below. 


The reason for this is that the angle of the trangle will rise in the middle if you do not round the center. You will need to come up 1 1/2" on the sides of the triangle.
Sew into the side seams as you would any gusset.
There are lots of different design ideas that can be added to this pattern. we'll go through a few more over the summer. Hope you're staying cool!


Share this PostPin ThisShare on TumblrShare on Google PlusEmail This

Thursday, June 28, 2012

The Tree Of Life Bag

Last week I postd the bag that I am working on. There was such a nice response to the bag that I am offering to do another bag as a knit along. We'll begin on Wednesday, July 18th. That gives me a bit of time to finish this bag and figure out the changes that I want to make to the bag and it gives anyone who would like to knit along a chance to get their supplies.
 All of the pieces are finished,
and I have begun to sew them together.
One side panel is in. I really like how this looks.
 I'm very happy with the overall shape and style of the bag.
I don't like the bobbles on the bottom of the bag. I think that the first tree of life design should not be there. 
 The bobbles on the bottom are just rather distracting to me.
I think that I would also like to change the center cable. All the other cables and the bobbles seam to have a tighter feel to me and this cable just seems a bit out of place. My thoughts anyway.
Next Wednesday I will post the finished bag as well as all of the supplies that you will need in order to knit a new one along with me. I think this will be loads of fun. Hope you can join me.


Share this PostPin ThisShare on TumblrShare on Google PlusEmail This

Raggedy Ann And Andy Get Ready For The Ball

Back in April I made these dolls. They are really quite easy to do as they start out as a panel that you simply cut apart and sew together. You can find a panel here on Ebay just in case you are interested.
Naked and hairless dolls, but so cute! As I said, the dolls are quite easy to put together, expect for the hair. It's not that it's so difficult, just takes time. The clothes are also from a pre-printed panel.
And finally, my finished dolls. They are going to be a part of a silent auction item for Lincoln Park Zoo, one of the last free zoos in the United States. When I say free, it's free to those who come to the zoo, there are a lot of people working very hard to raise funds in order to keep the zoo free.
Yesterday I put the quilt top together for the second piece of the auction item. It's for a double size bed. I don't think I have ever sewn so many 1/4" seams in my entire life. I dreamed about 1/4" seams last night!!  
The inset panel that you see above was left from I think the dress panel I made for the doll. Wherever it came from, I saved it and thought it would be cute to add to the quilt, but as you can see it had a few issues, one being that it wasn't exactly the right size. I pieced in a little daisy fabric that I had and made it work. The other issue is the printing in the upper right hand corner.
I decided to make a heart and applique it on top of the writing and no one will be the wiser. I think I will put a few hearts in other places on the quilt as well just to tie it all together, maybe.
My next step will be to sew the borders on to the quilt top. If I can get a little more of the piping that you see above, I am going to use it along with a narow strip of the yellow fabric and then finish it off with the small daisy fabric. I have a red and white check that I will bind the quilt with once I get it quilted. The quilting is going to be quite simple. I just need to get this finished.   
The last item of the auction package will be this little rocker. I will be making a slipcover for it this weekend. I plan to use the small blue daisy fabric and pipe it in the red and white check. As I work through the process, I will carefully document my work and I will post a slipcover tutorial next week. Slipcovers are really quite easy, just a little tricky in the corner of the seat.
This is not my favorite type of sewing to do, but once I get into to it, I have a good time. My husband saw the quilt top this morning and asked if I am going to be able to give it away. He knows that so much of my heart goes into these projects, but in the end, I am very happy to be able to be a part of something that has such far reaching benefits.


Share this PostPin ThisShare on TumblrShare on Google PlusEmail This

Tuesday, June 26, 2012

Picasso, A T-Shirt and A Skirt

A few years ago my husband and I went to ski in the very small country of Andorra. It was a magical trip. I must admit that until we planned the trip, I had no idea that Andorra even existed. While I was there, I did find a fabric store that was by far the best fabric store I've ever visited. The woman who owned the store was able to purchase the end pieces from Italian and French designers. I have a piece from Ungaro fabric that I have yet to cut into.
Before we came back to the United States, we had a stop in Barcelona, Spain, another magical place. I loved every moment while I was there. We visited the Picasso museum. What an incredible experience. As we were leaving the museum, we came across a small boutique and in the window was the t-shirt pictured above. I immediately loved it as it reminded me so much of Picasso. We went in and my husband bought the t-shirt as a nice little souvenir and reminder of our visit to the museum.
 Now here is my dilemma with the t-shirt, it didn't shrink around the body, but in the length. So now the shirt is much shorter than what I want to wear. A few weeks ago as I was going through my clothes and deciding what I would keep and what I would give away, I came across this shirt. The idea of giving it away was just impossible for me, so many lovely memories. 
I know, I don't need to have the shirt in order to have the memories, but I just didn't want to part with it. So rather than leave it languishing in the cedar chest, I decided to get it out and see what I could do to remake into a useful garment. 
To begin with, I cut off all the serged seams.
Then I straightened out the neckline,
 and the side seams.
 Now I had a nice little a-line shaped panel.
I took the sleeves and sewed the hem of the sleeve to the top of my new panel. Then I sewed the back panel to the sleeves just as I did the front panel.
I had a small scrap of some black bamboo knit that I used to make as yoke for the waistline and added a trim to the hem.
So now I'm set, my t-shirt was saved and I have a new skirt.
I'm happy.


Share this PostPin ThisShare on TumblrShare on Google PlusEmail This